BIOTECHNOLOGY TOOL
COMPANY : JACKSON LABORATORIES
APRIL - JULY 2023
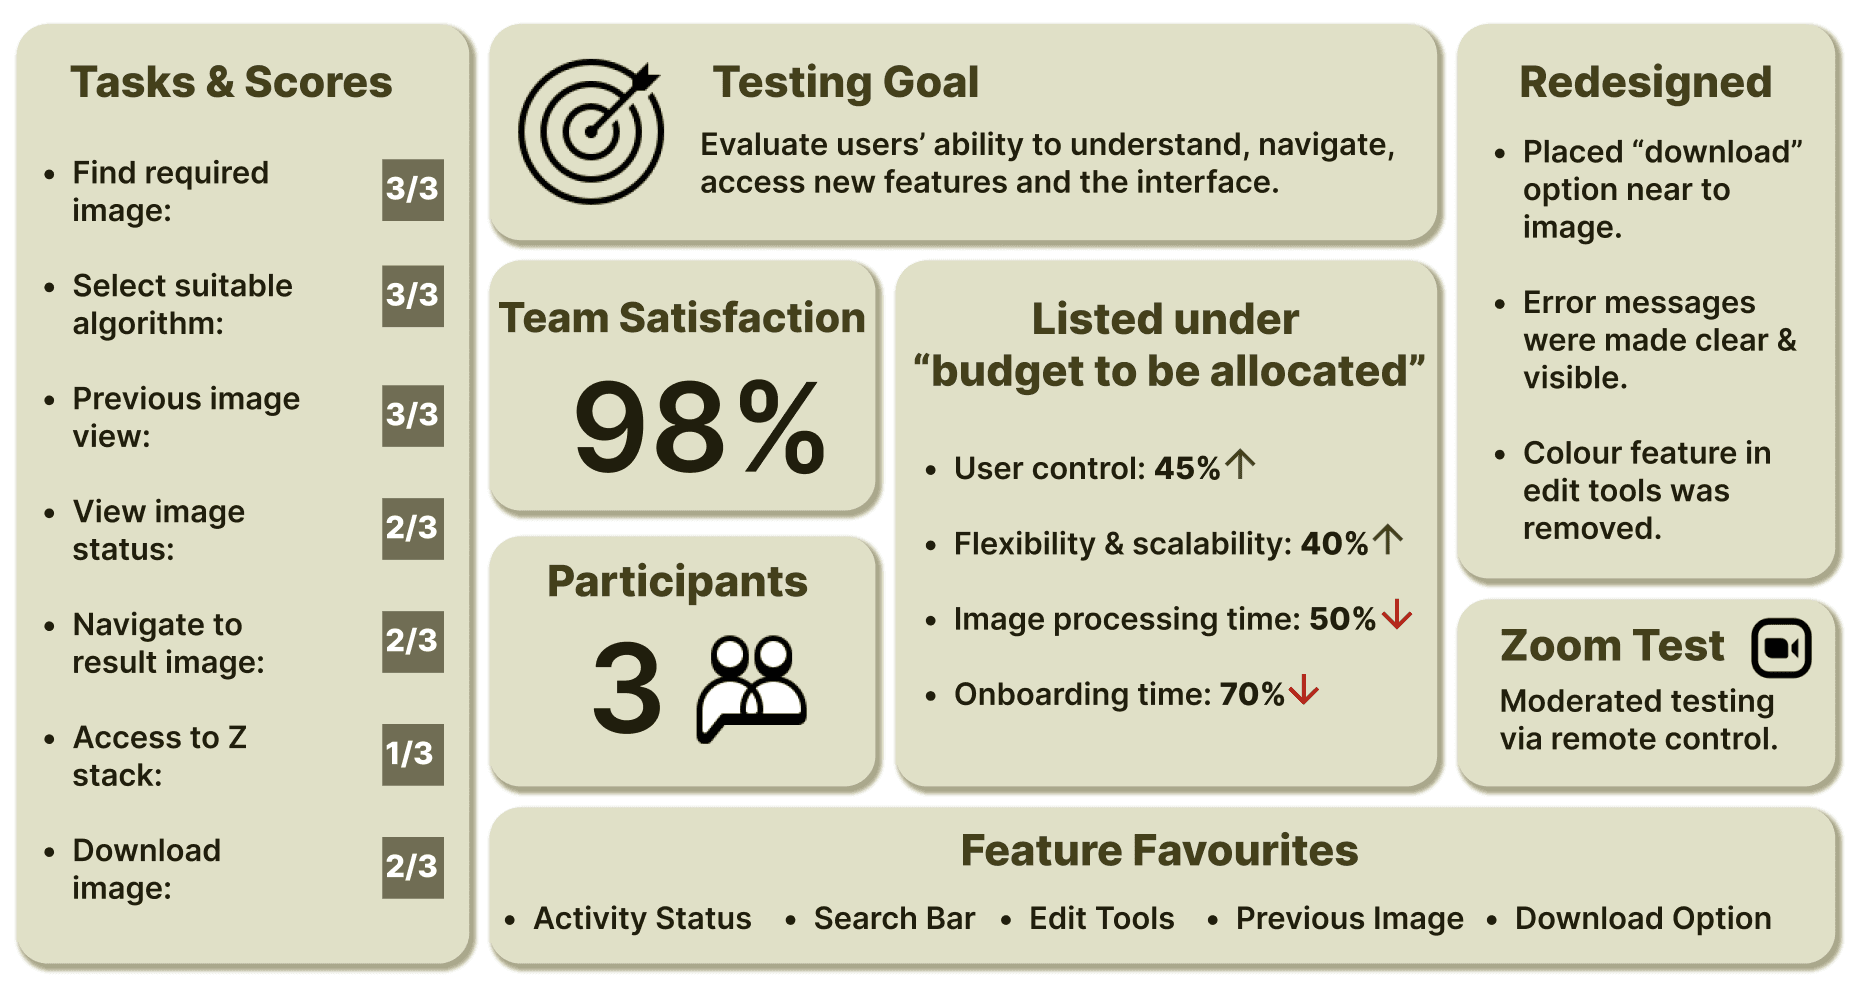
TEAM SATISFACTION- 98%
Newbie's iterative research & design reduces workload by 55% and secures budget approval for image tool
Disclaimer: Claimed permissions to disclose project details
First things first - Brief Introduction
What is Cloud Images Tool(CIMG)?
CIMG, or Cloud Images Tool, is a cloud-native platform for developing and deploying conventional and ML/AI image analysis workflows. Users can conveniently perform image analysis tasks directly in a web browser, enhancing accessibility and usability.
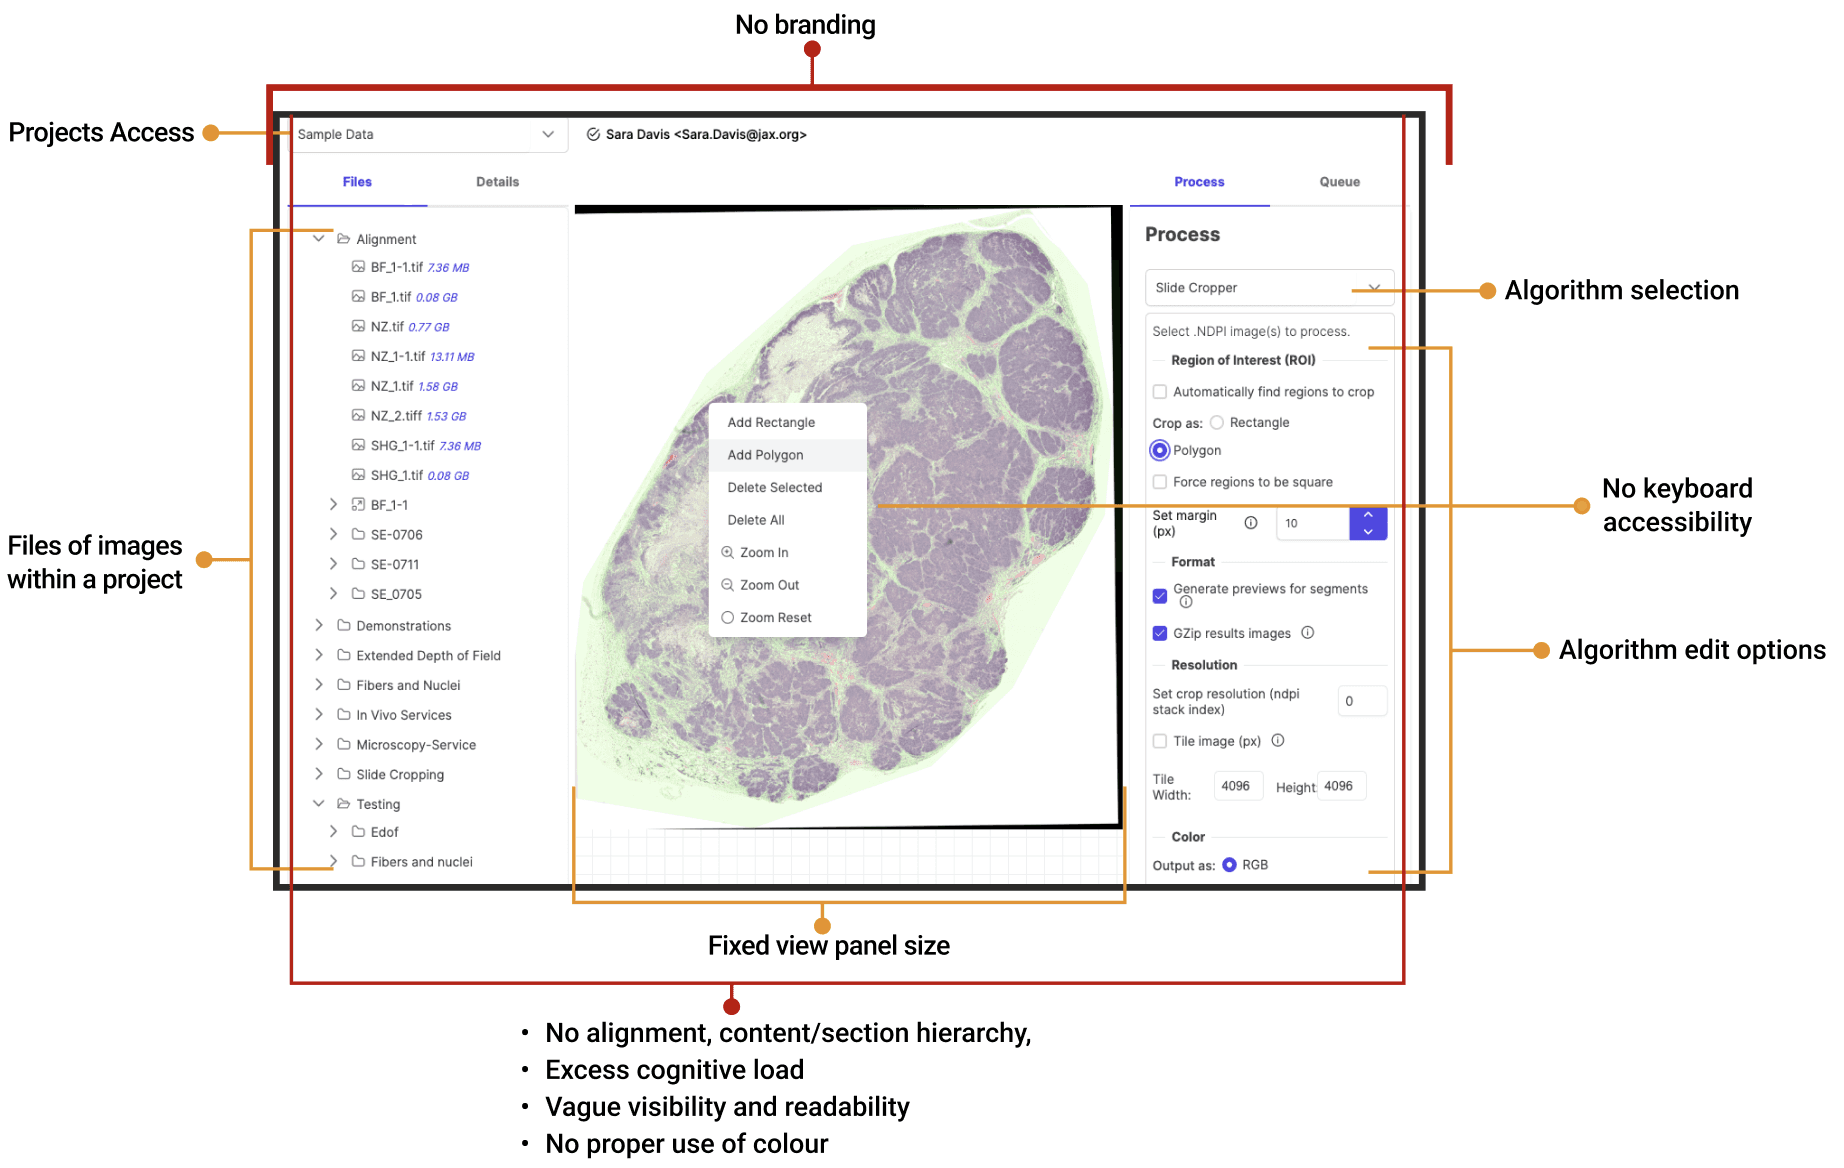
Reason for Redesign - Problem Statement
Redesigning the interface to reduce workload by increasing flexibility and scalability through the following improvements:

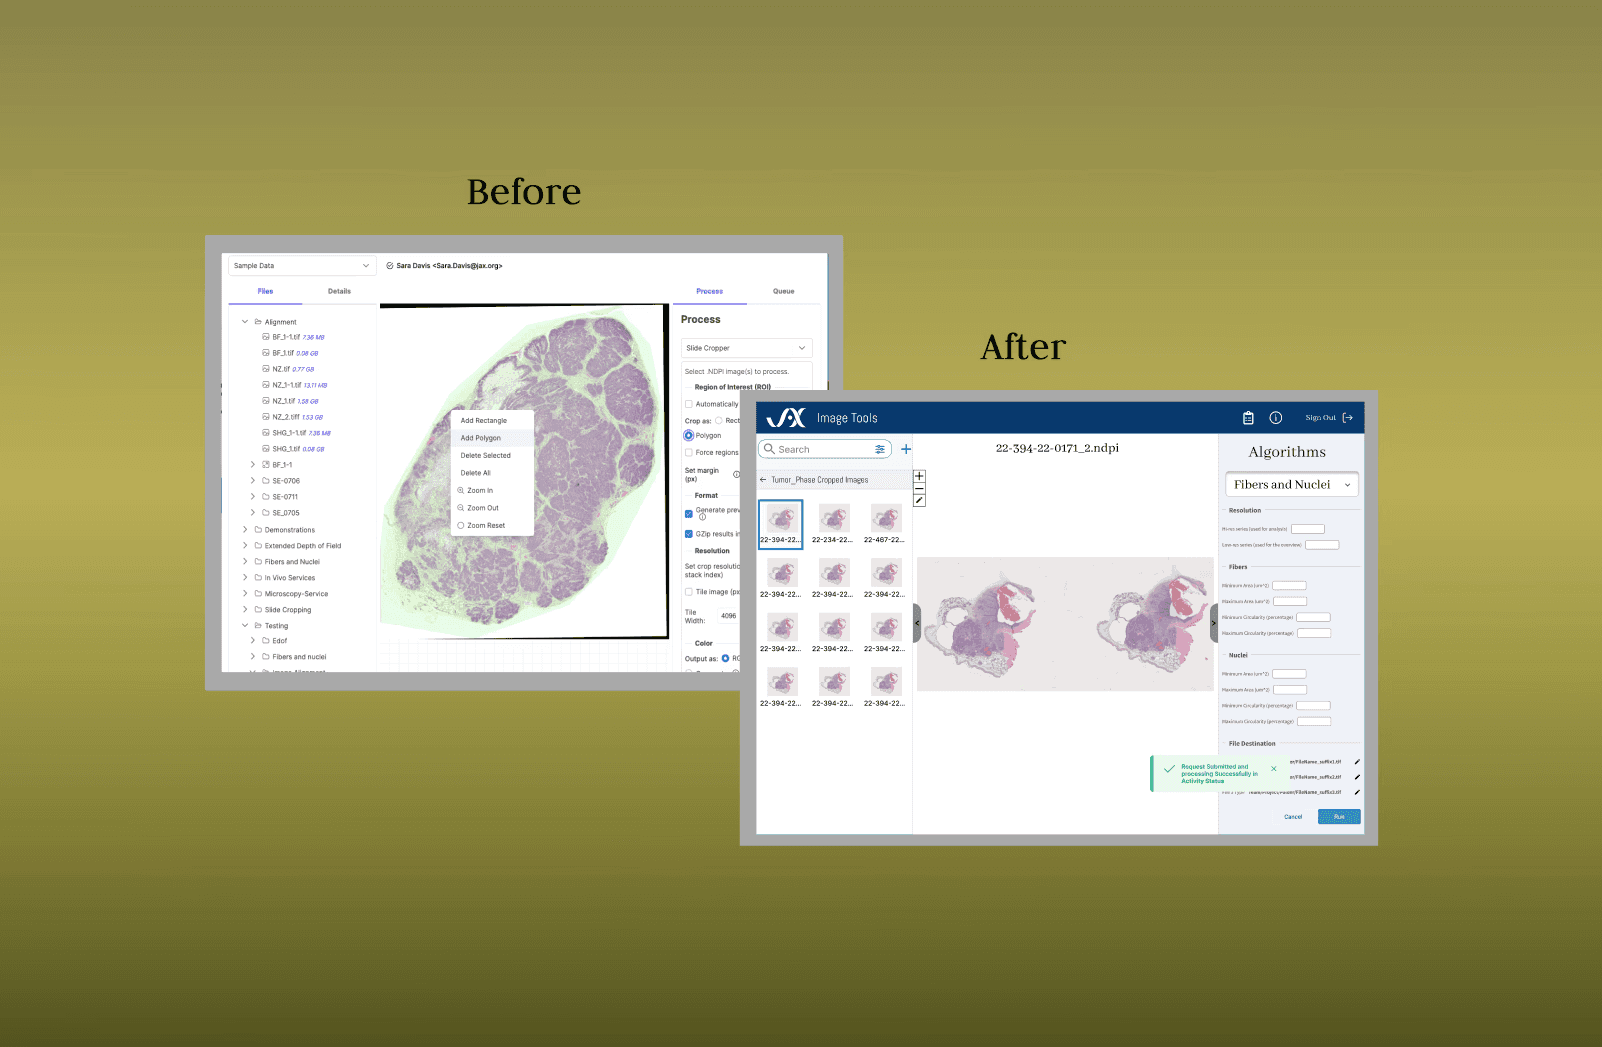
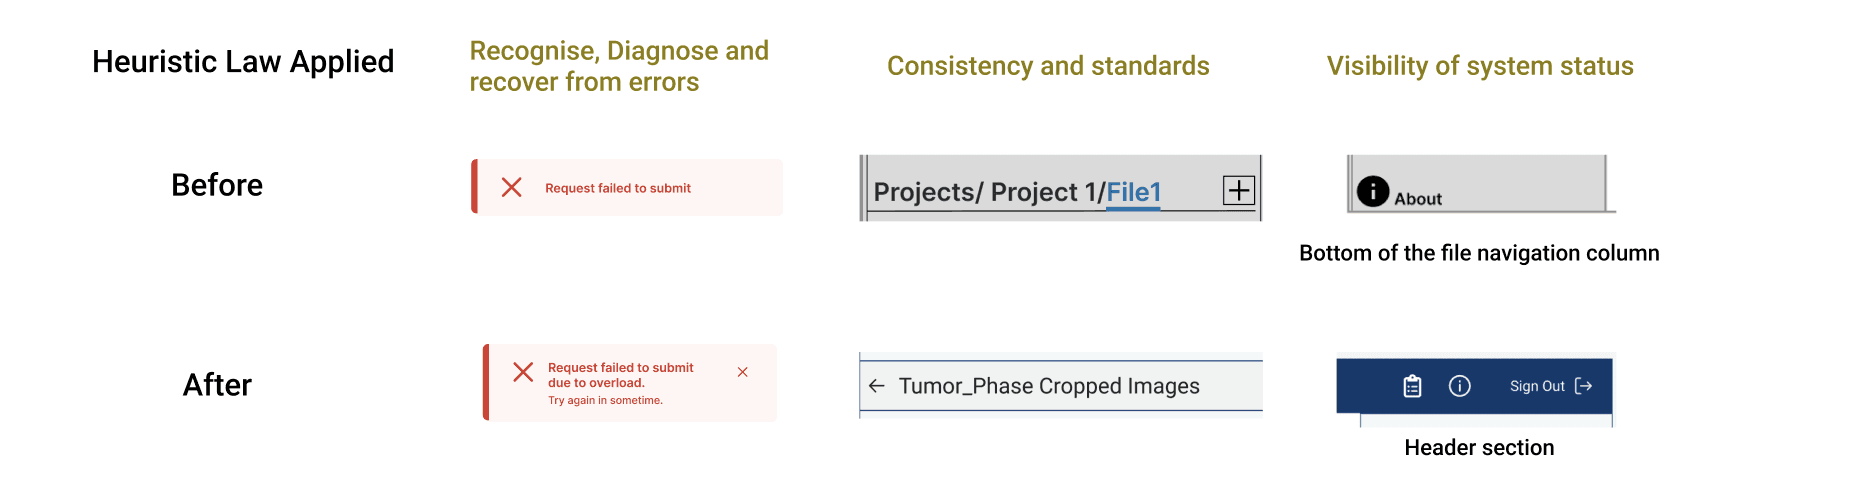
Before / After Preview — key changes that enhanced user experience
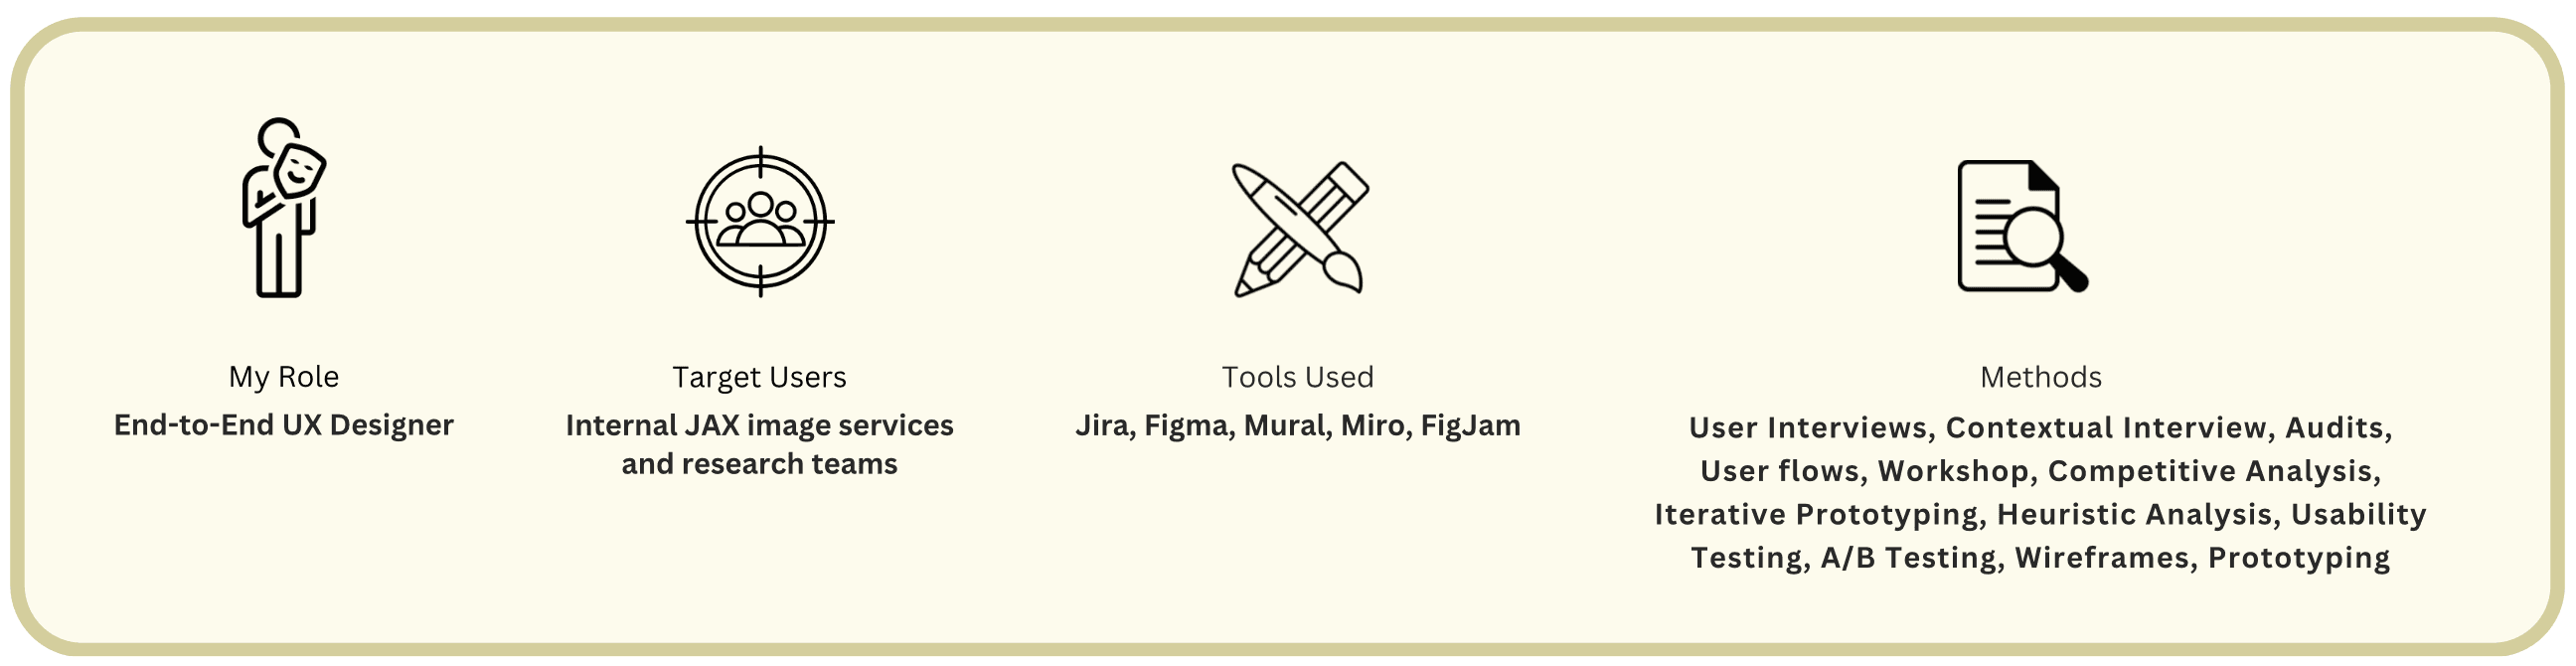
How did the newbie in Biotech lead the project adapting to complexity?
Step 1: Got onboarded into the project
I conducted an internal team meeting with UX Manager and Mentor (Sr.UX Designer) to understand:
The problem statement
Quick overview and functioning of the tool
Budget limitations
Scope of the project
Sprint planning of the project
Timeline: 04/10/2023 - 07/27/2023
Key Stakeholders
information is displayed above.
Step 2: DIY discovery adventure [Tool Research Interviews]
After reviewing Cimg resources and familiarising myself with the tool through discussions with the Cimg developer, prepared targeted questions for interviewing 4 key stakeholders(users).
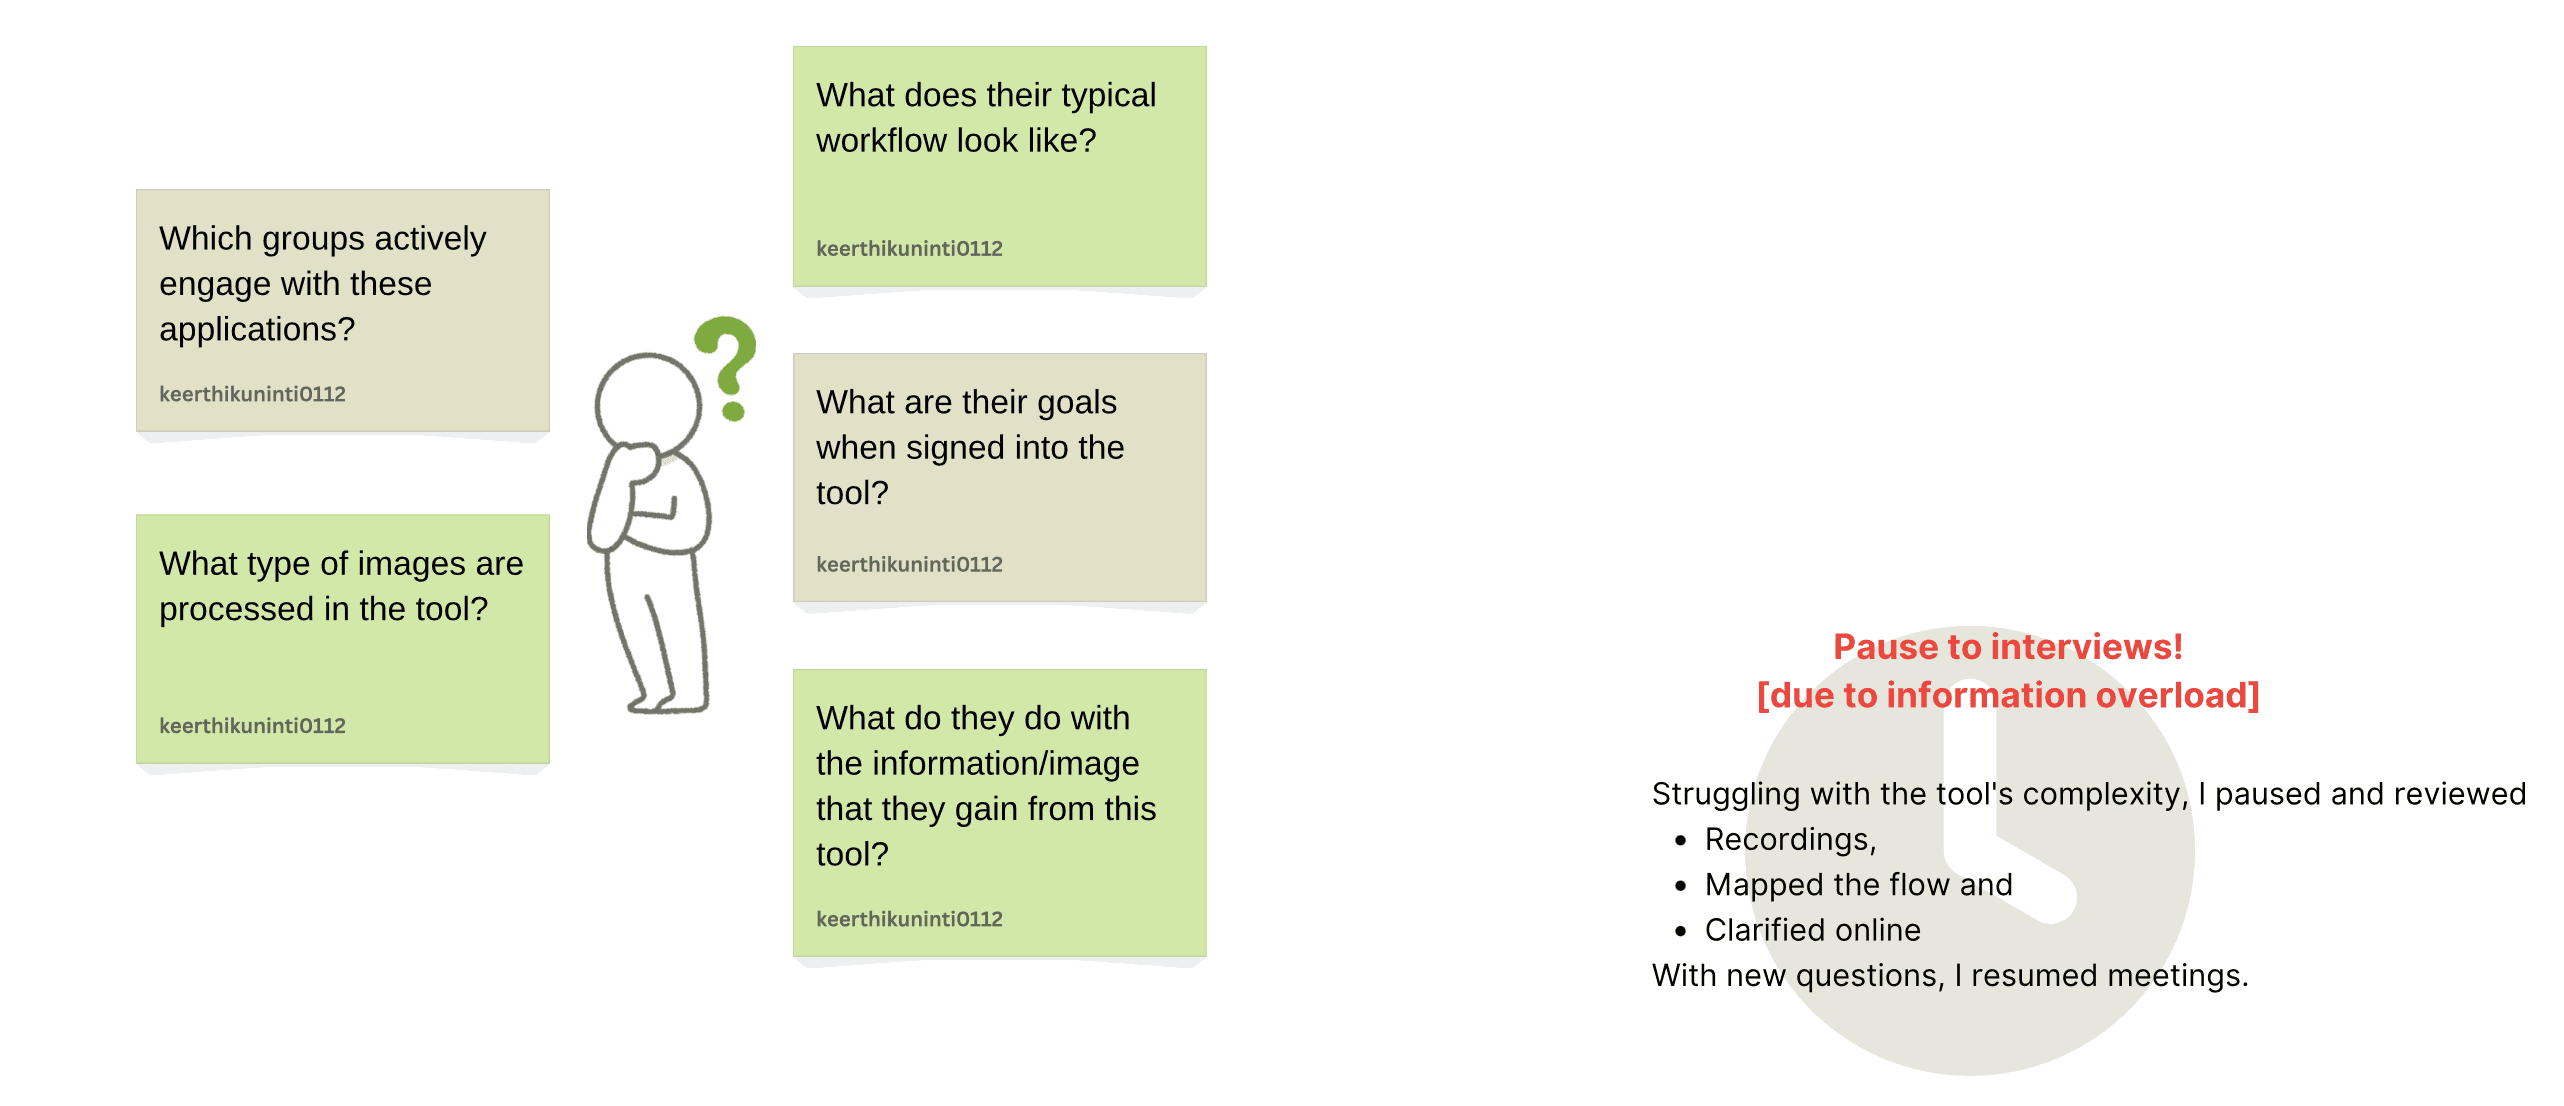
There are 5 different groups
Step 3: Research insights to visualising the flow [understanding common flows to maintain adaptability]
Research interviews showed diverse tool uses across teams, each familiar only with their own use cases. I streamlined individual workflows into a unified navigational path, working closely with the Project Manager and Developer to enhance understanding.
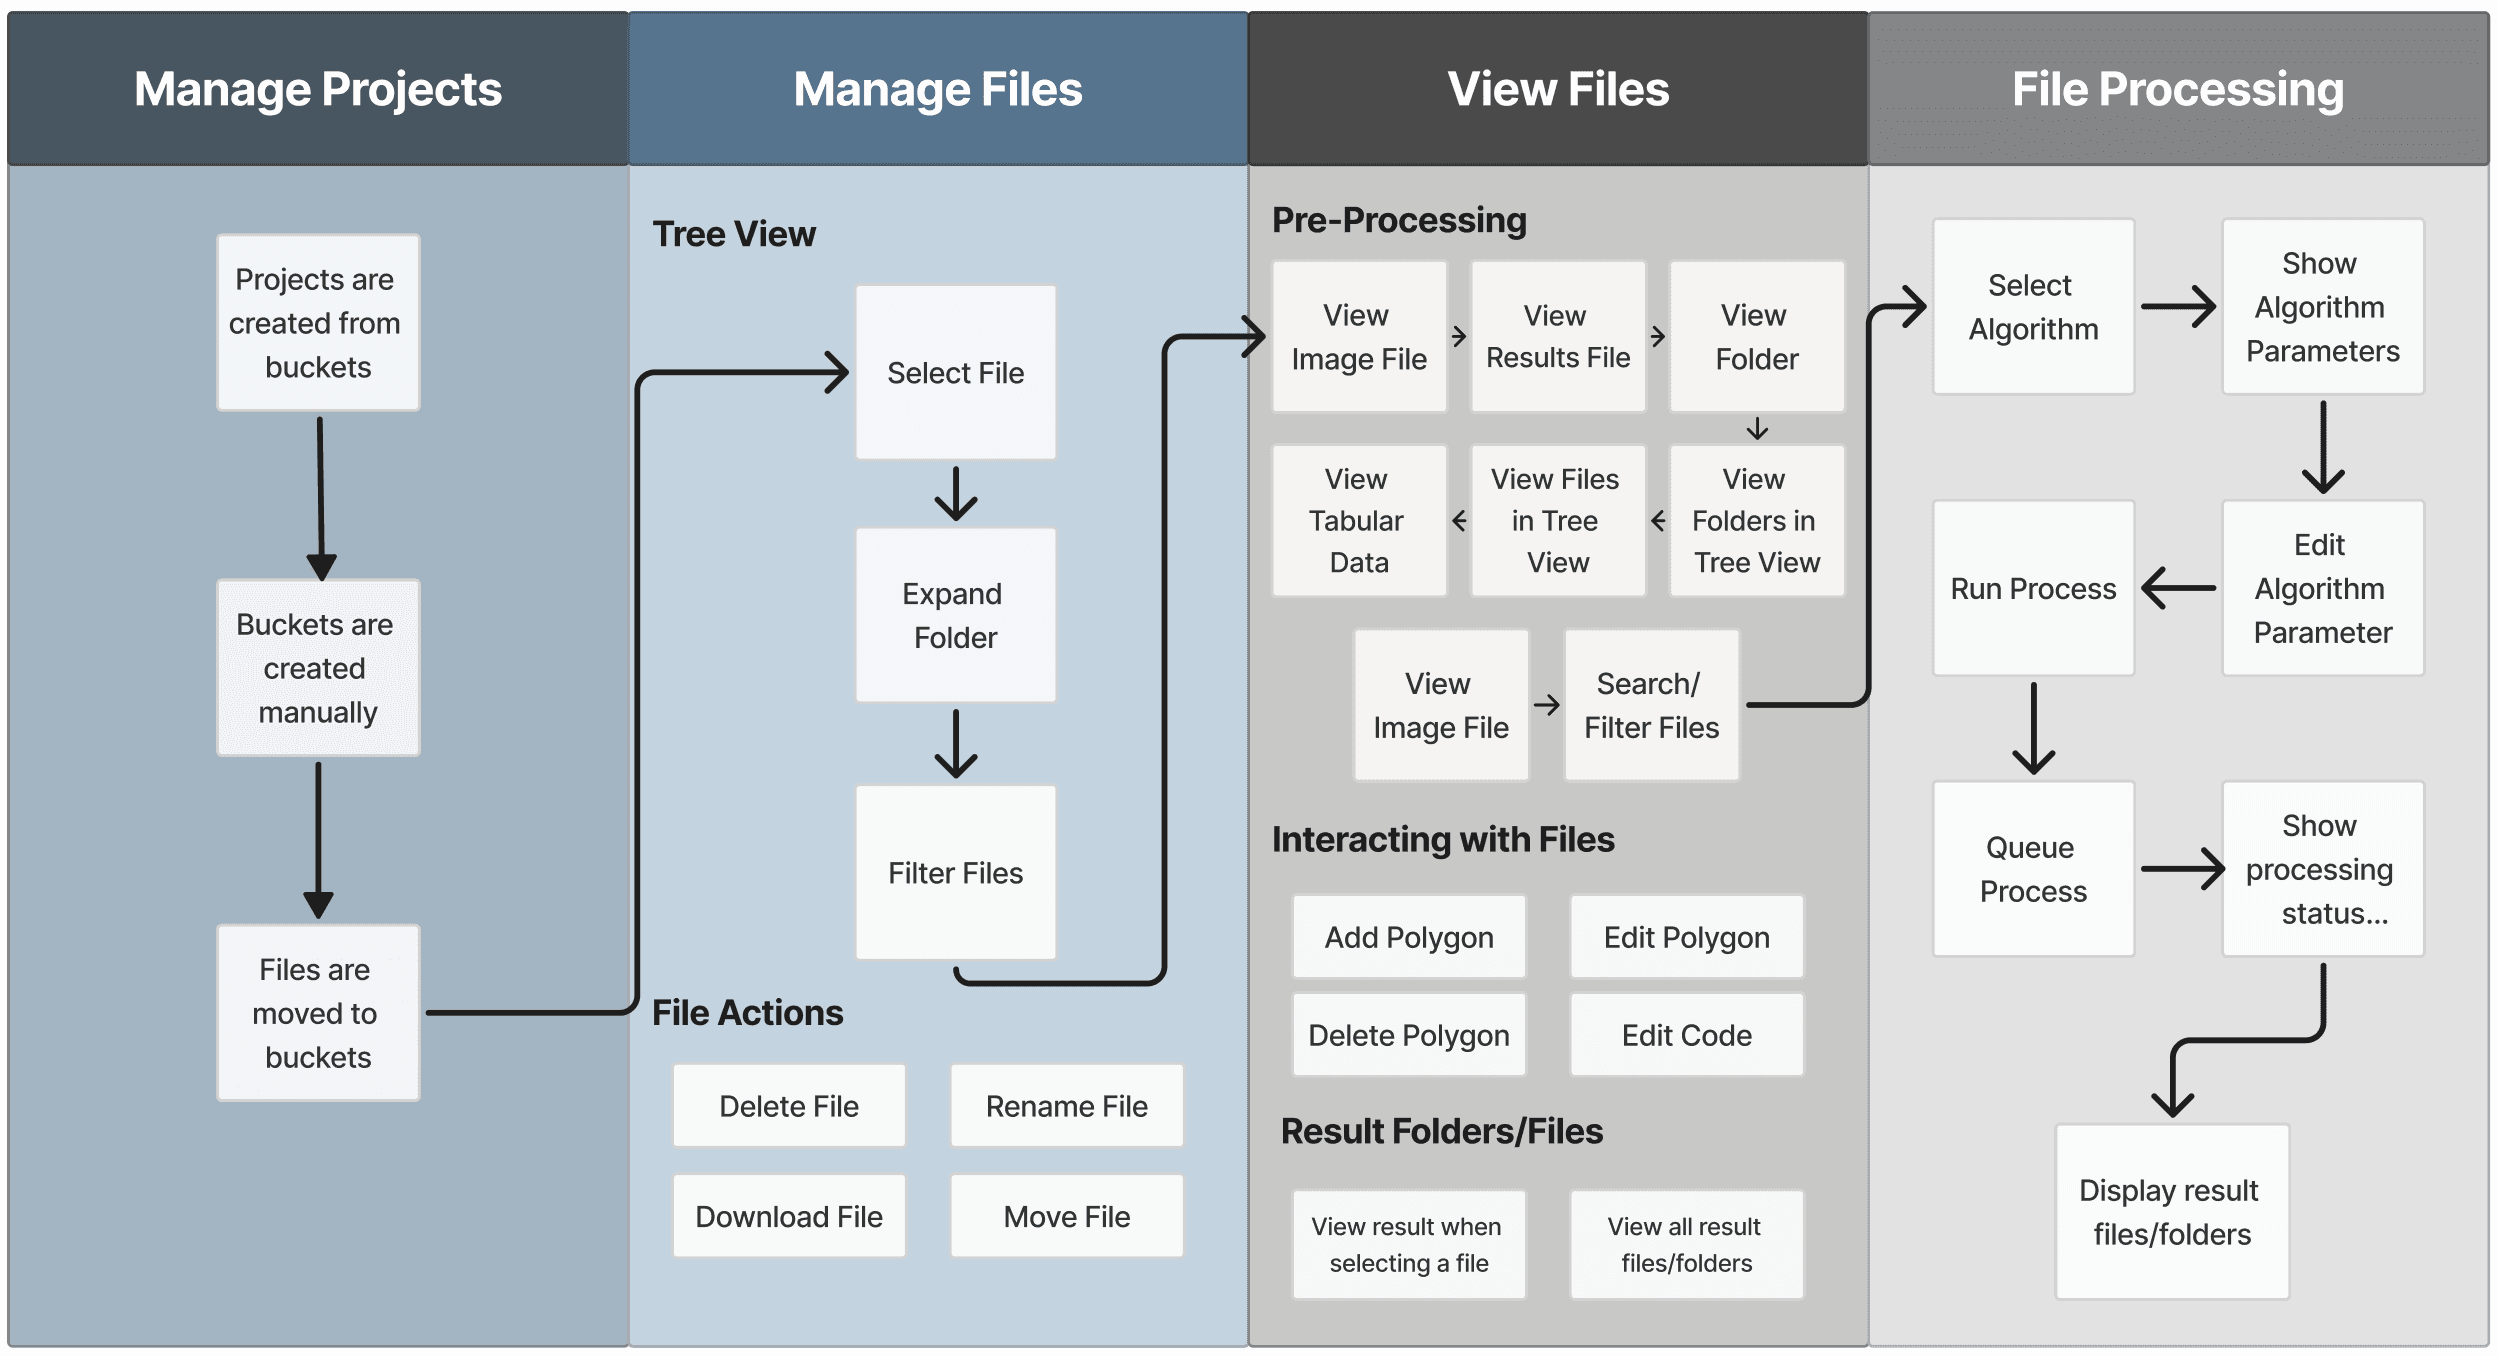
The flow outlined below is consistent across teams and crucial to maintain uniformity.


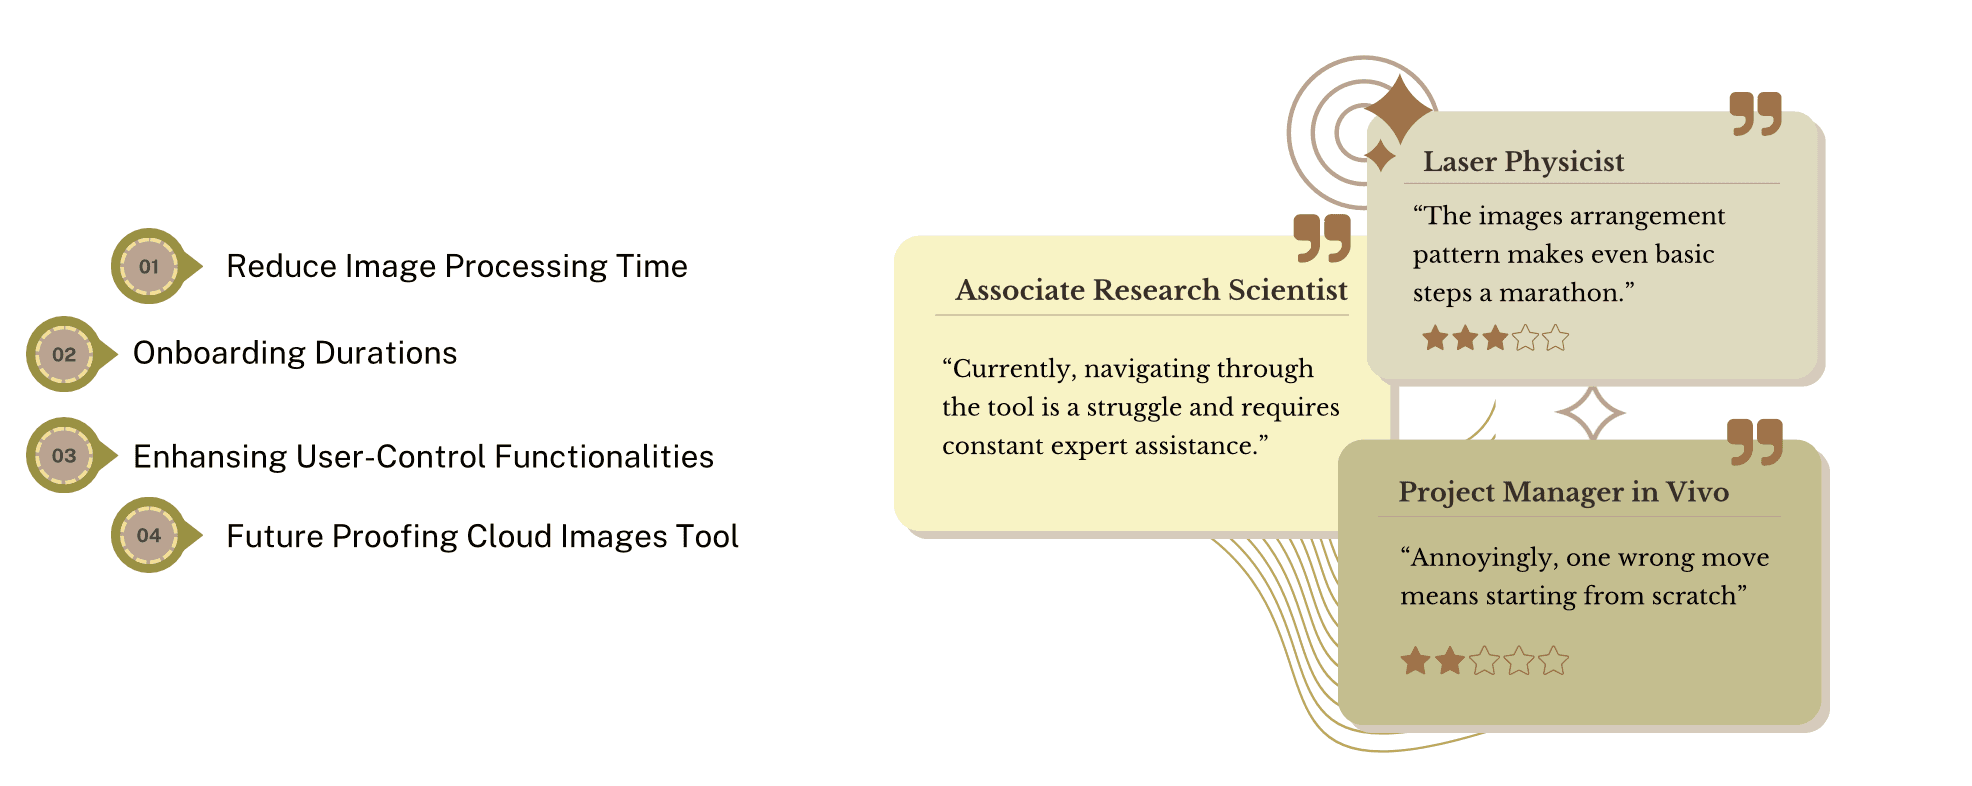
Step 4: From the map, into the users mind : 6 User Interviews, 1 Workshop later challenges were listed and synthesised
Six interviews were my gateway to user's current expectations, future goals, and deepest concerns.
But,

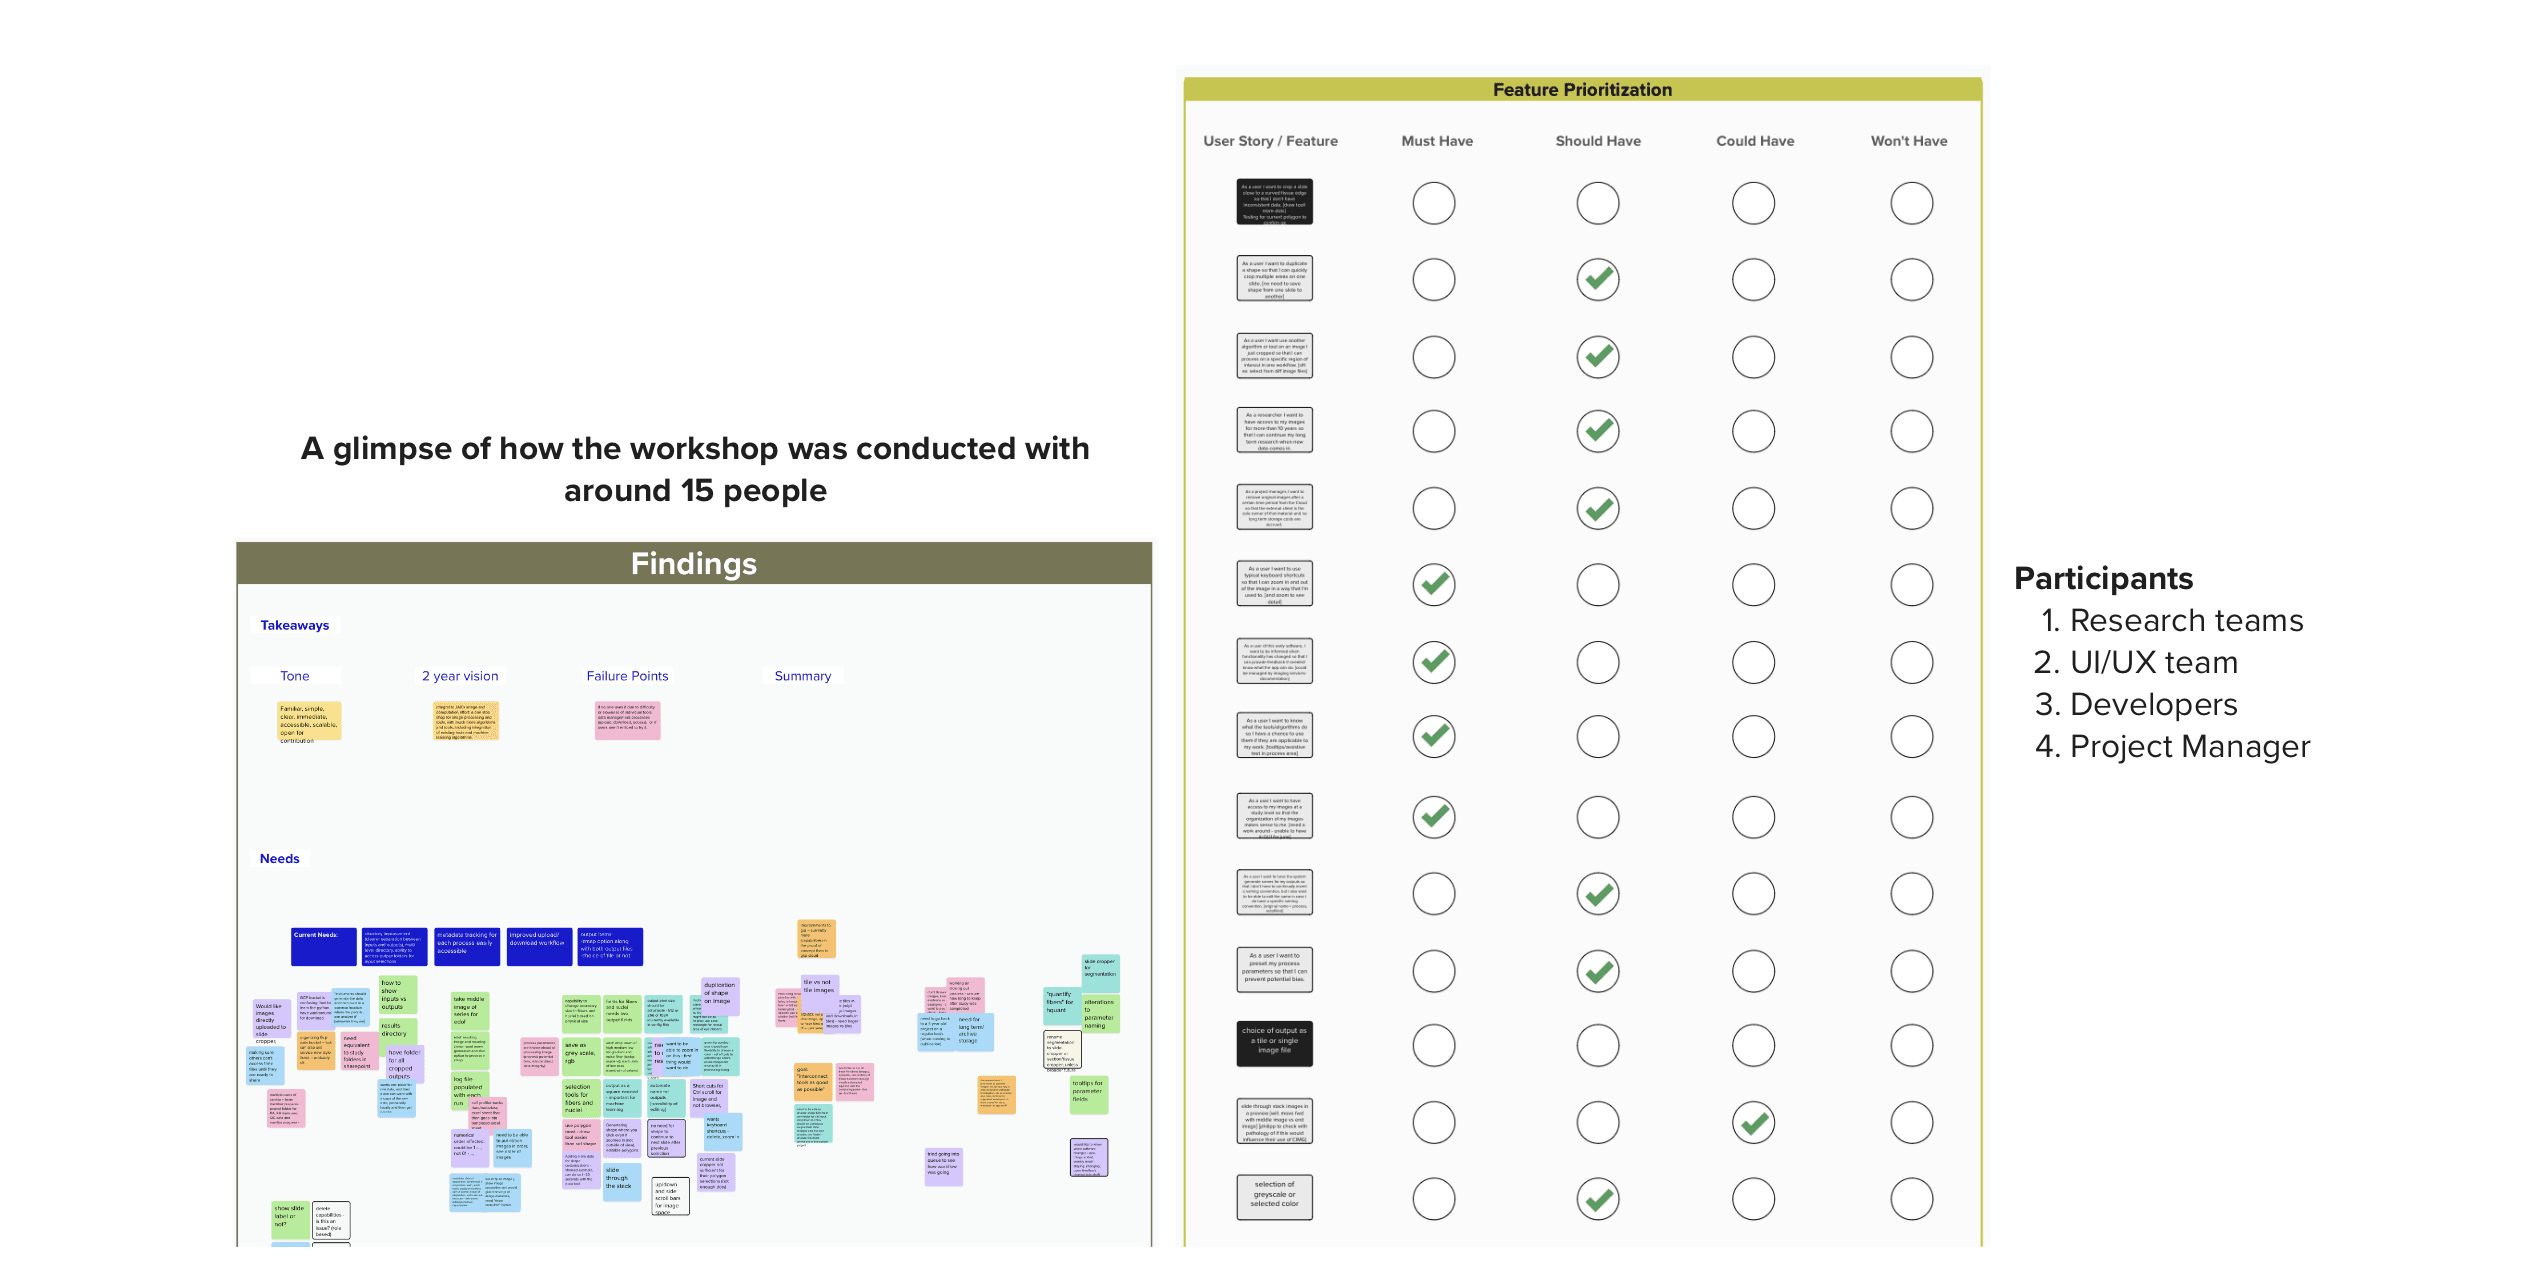
Out-of-Scope challenges post-workshop:
Multiple Images: Excluded to prioritise visibility.
Multiple Algorithms: Excluded due to increased cognitive load and reduced processing speed, which significantly impacts tool functionality.
Translating complex user data into clear requirements though pattern analysis
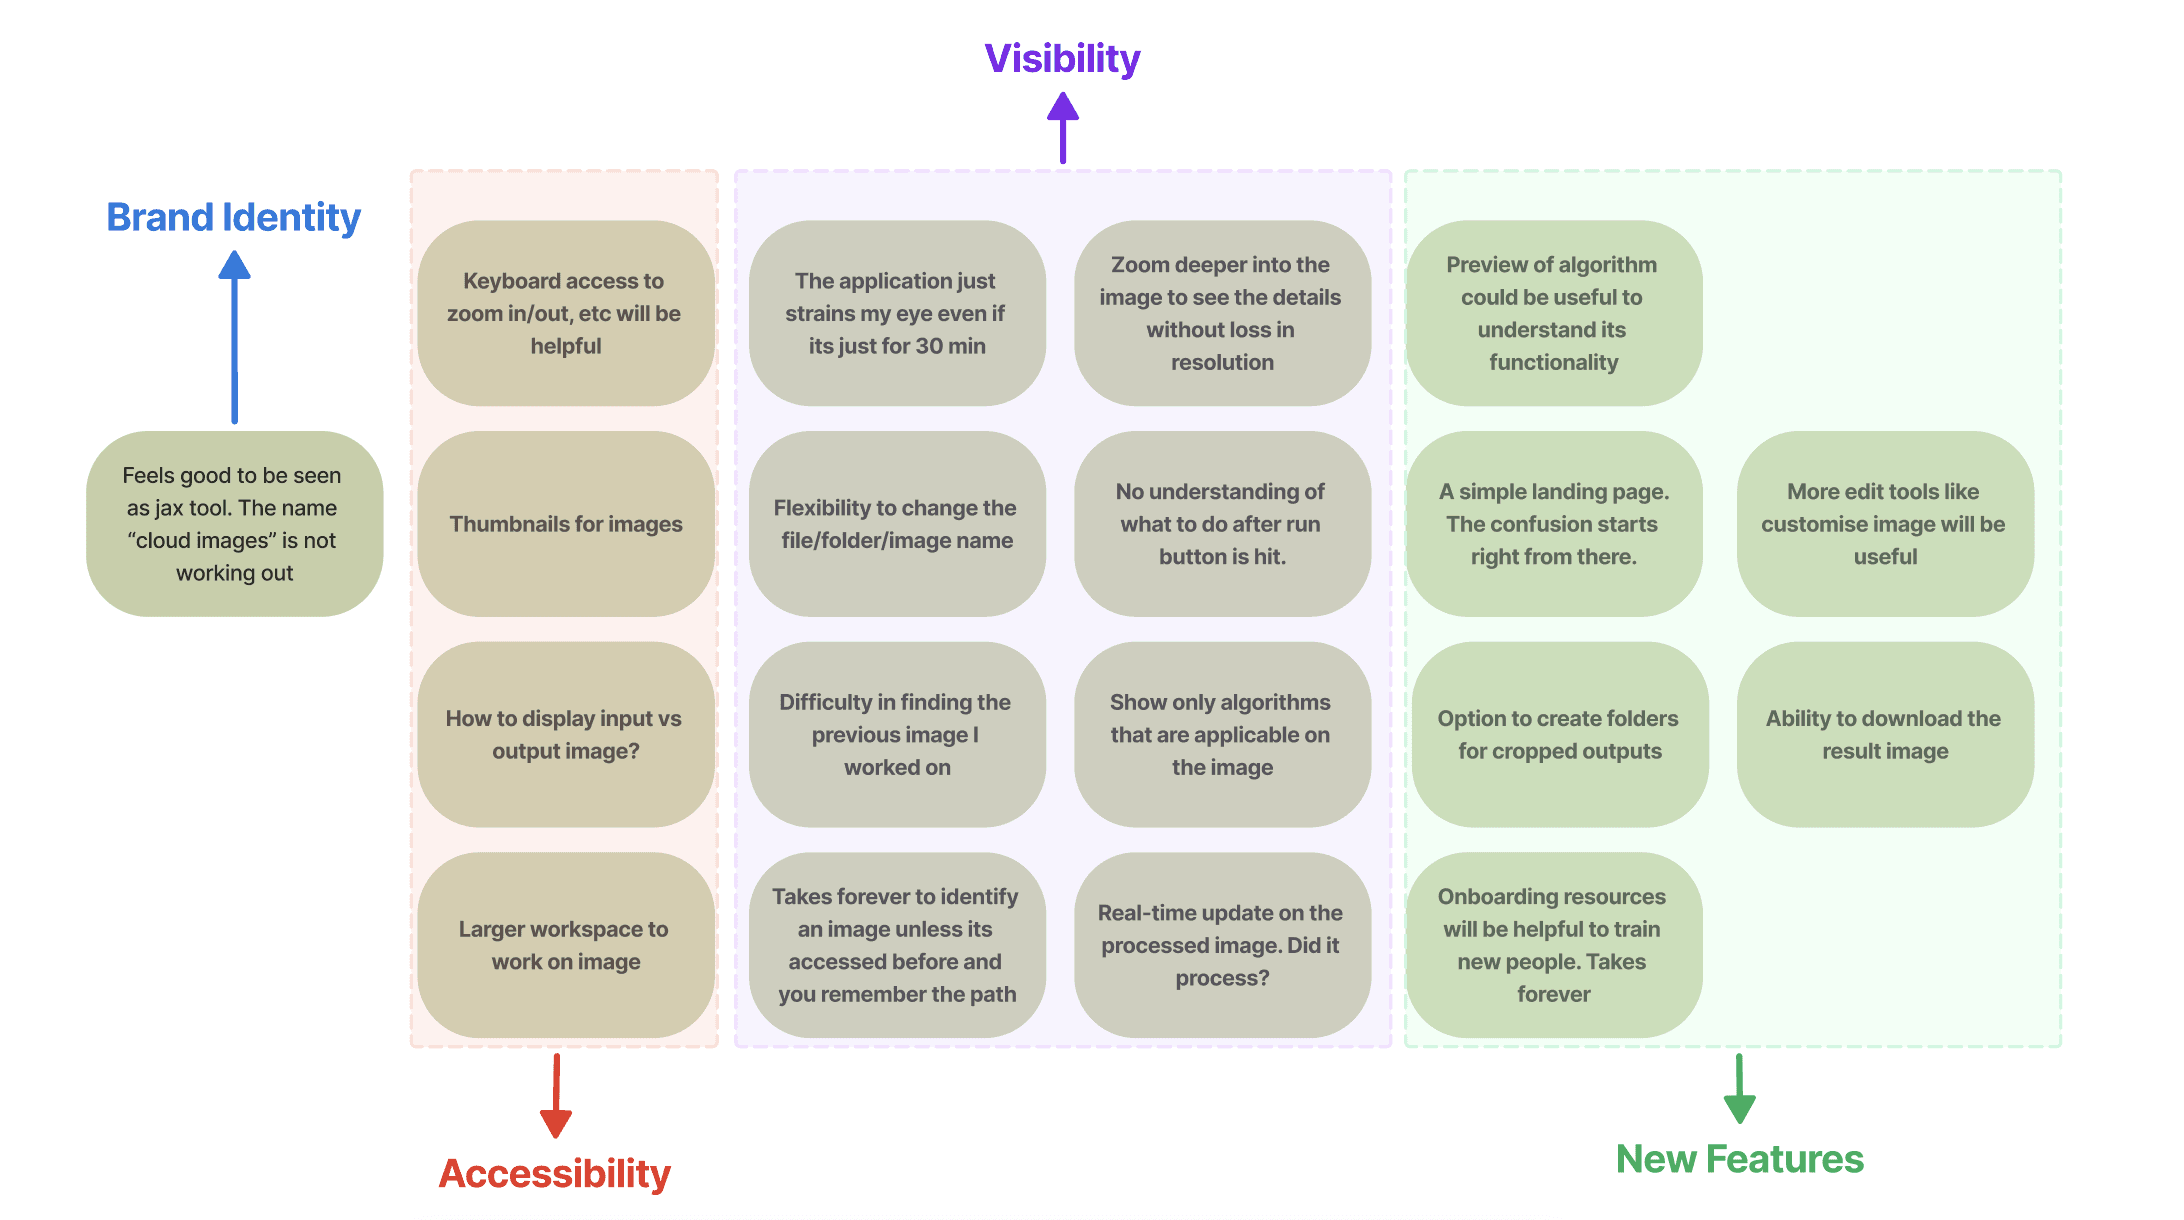
In summary, scientific researchers need a solution with a personalised brand identity, seamless accessibility, and intuitive features to boost productivity, enhance visibility, and streamline workflows.
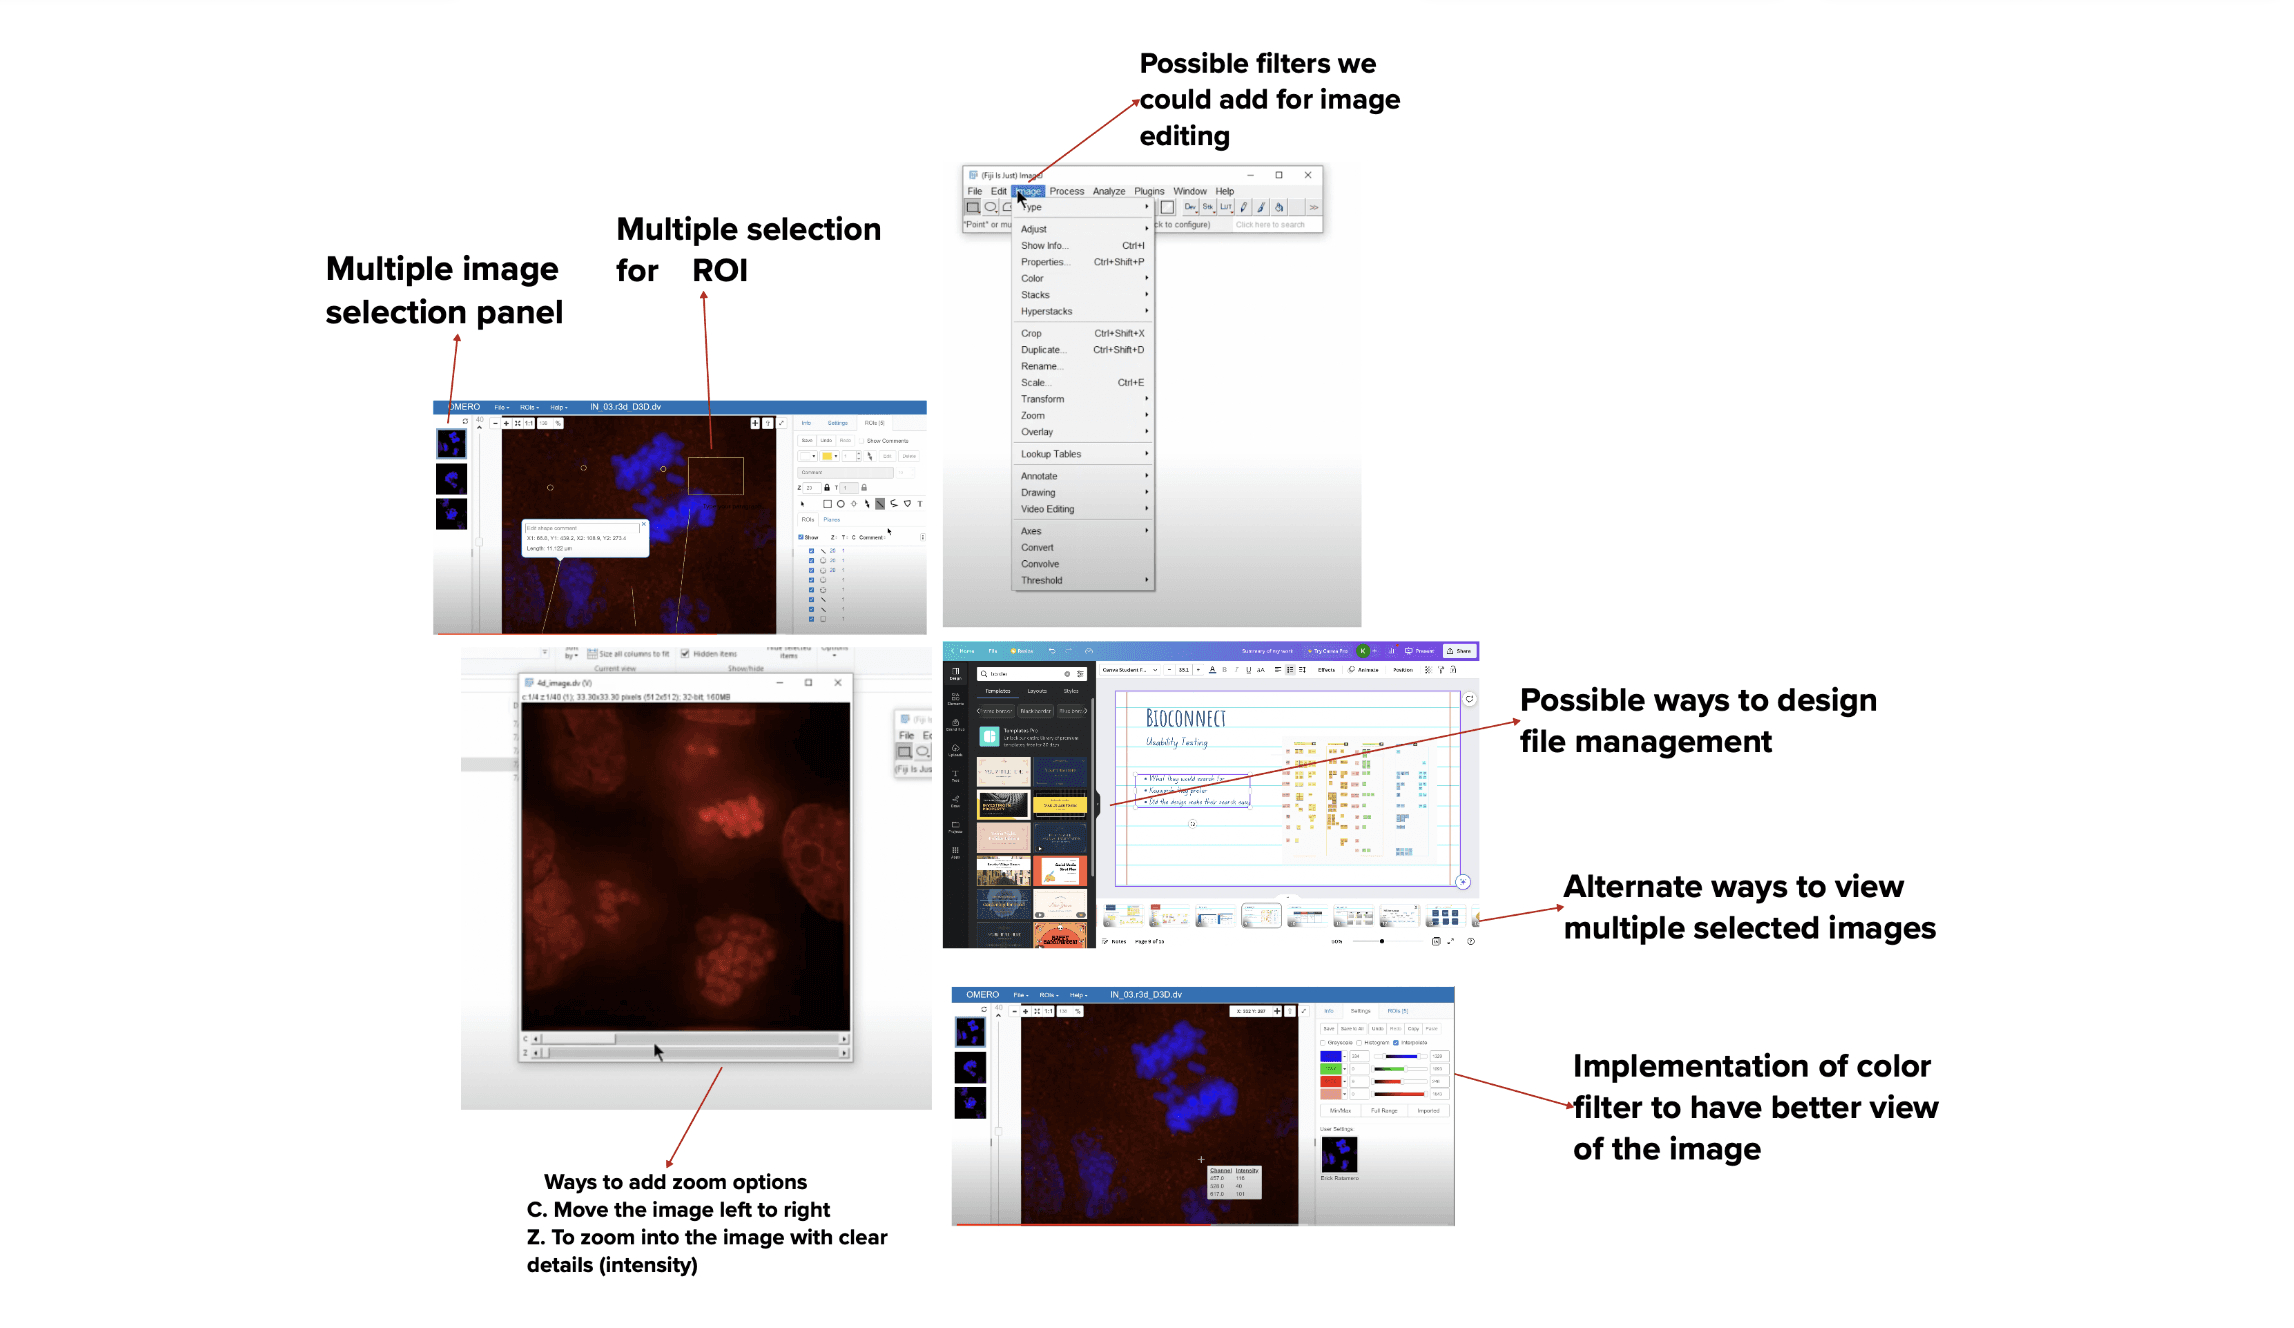
Step 5: From requirements approval to design inspiration: Leveraging image processing tools(Figi & Omero) and data categorisation techniques for Low-Fidelity sketches
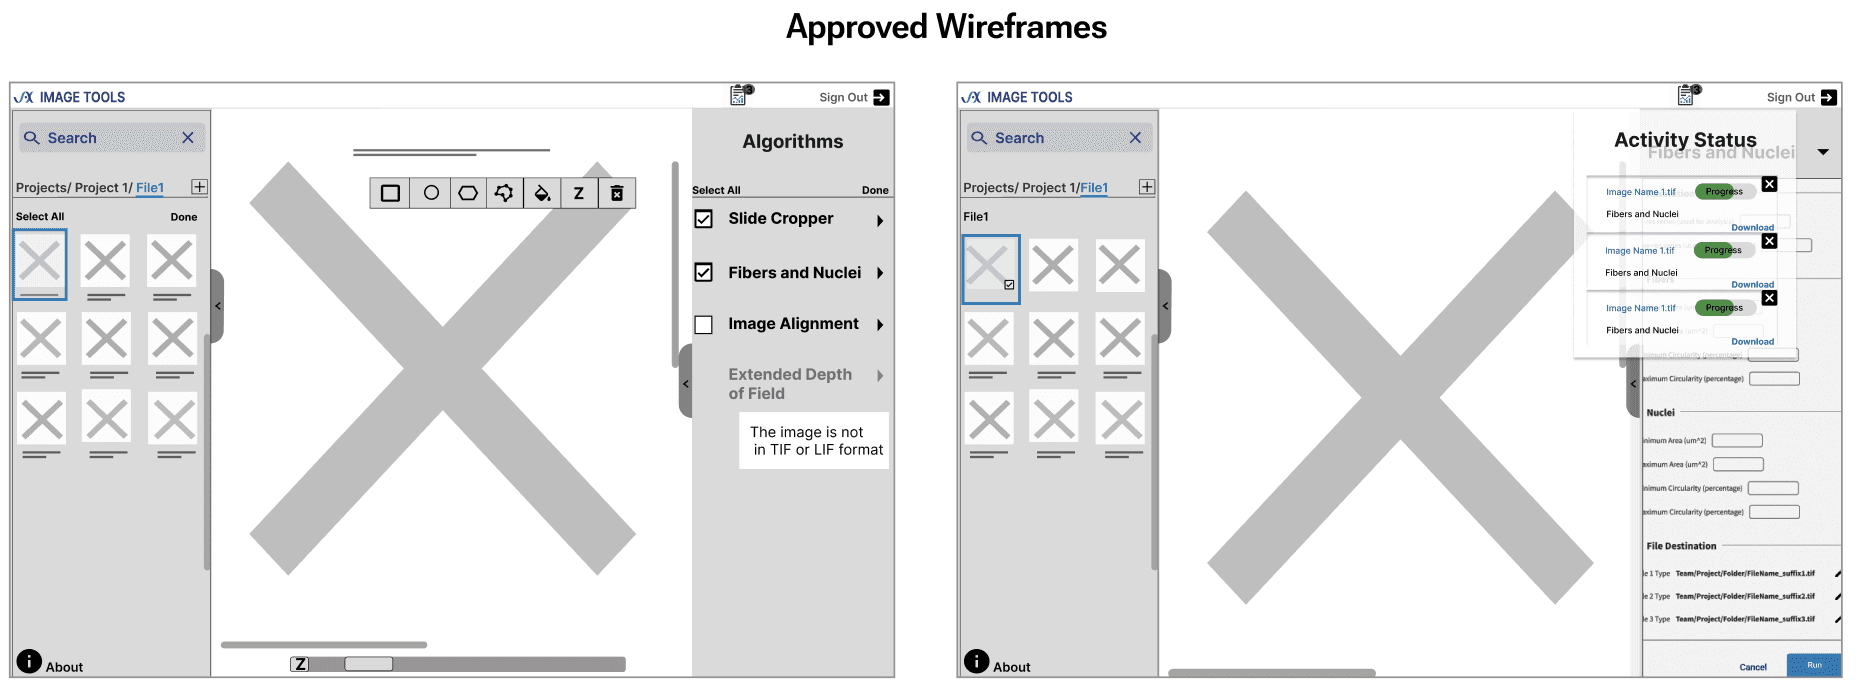
Step 6: Refined Low-Fidelity Designs: Finalised after 3 A/B testing Iterations
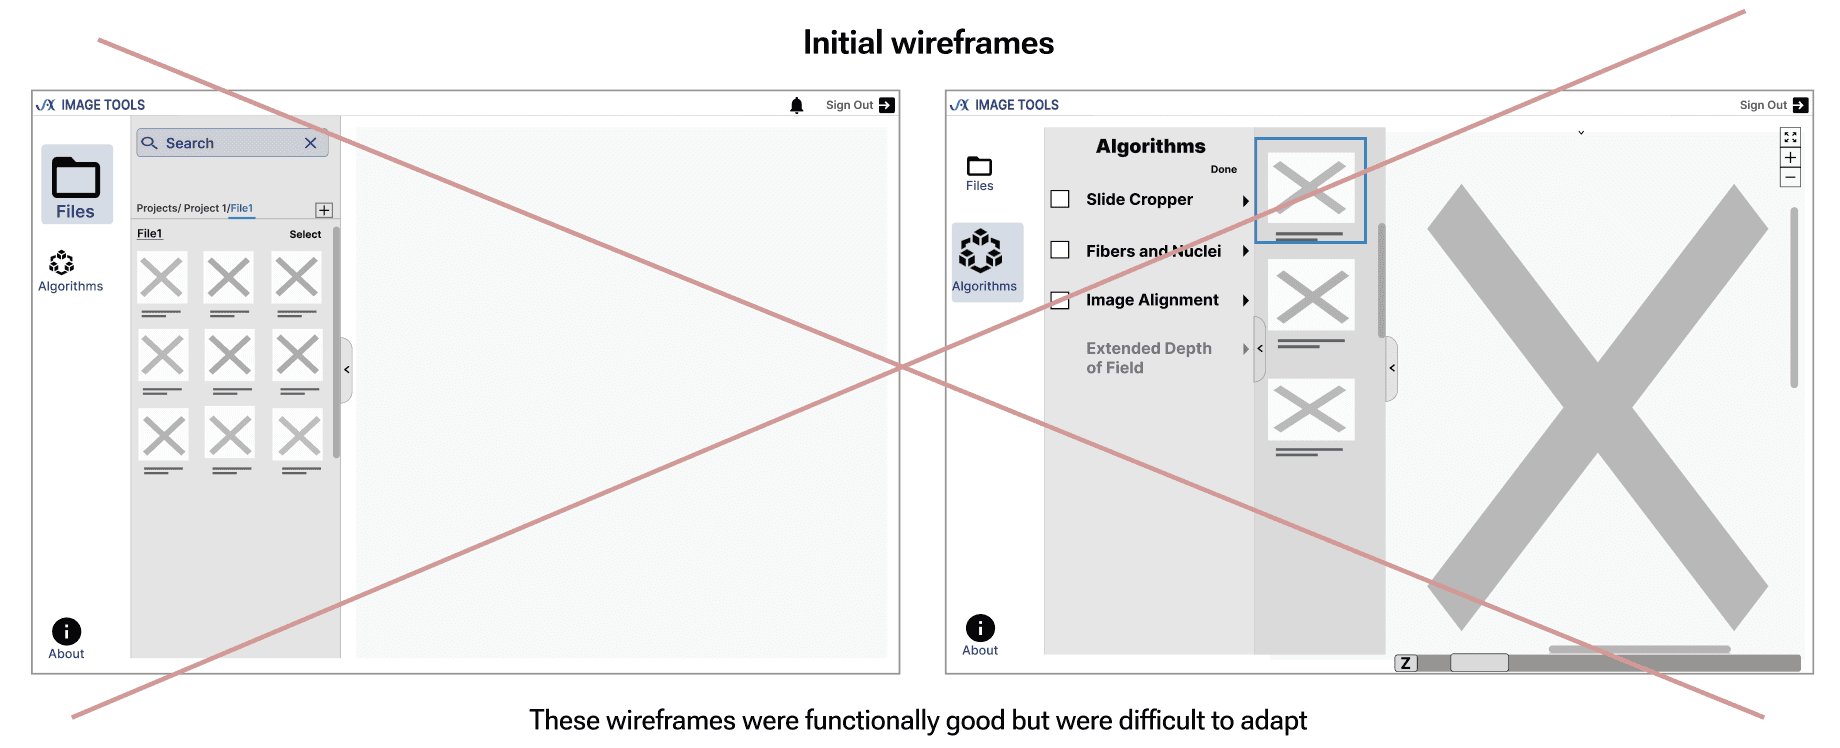
New wireframes prioritizing — Projects, Image Files, Algorithms, and the View Panel based on user needs for constant accessibility.
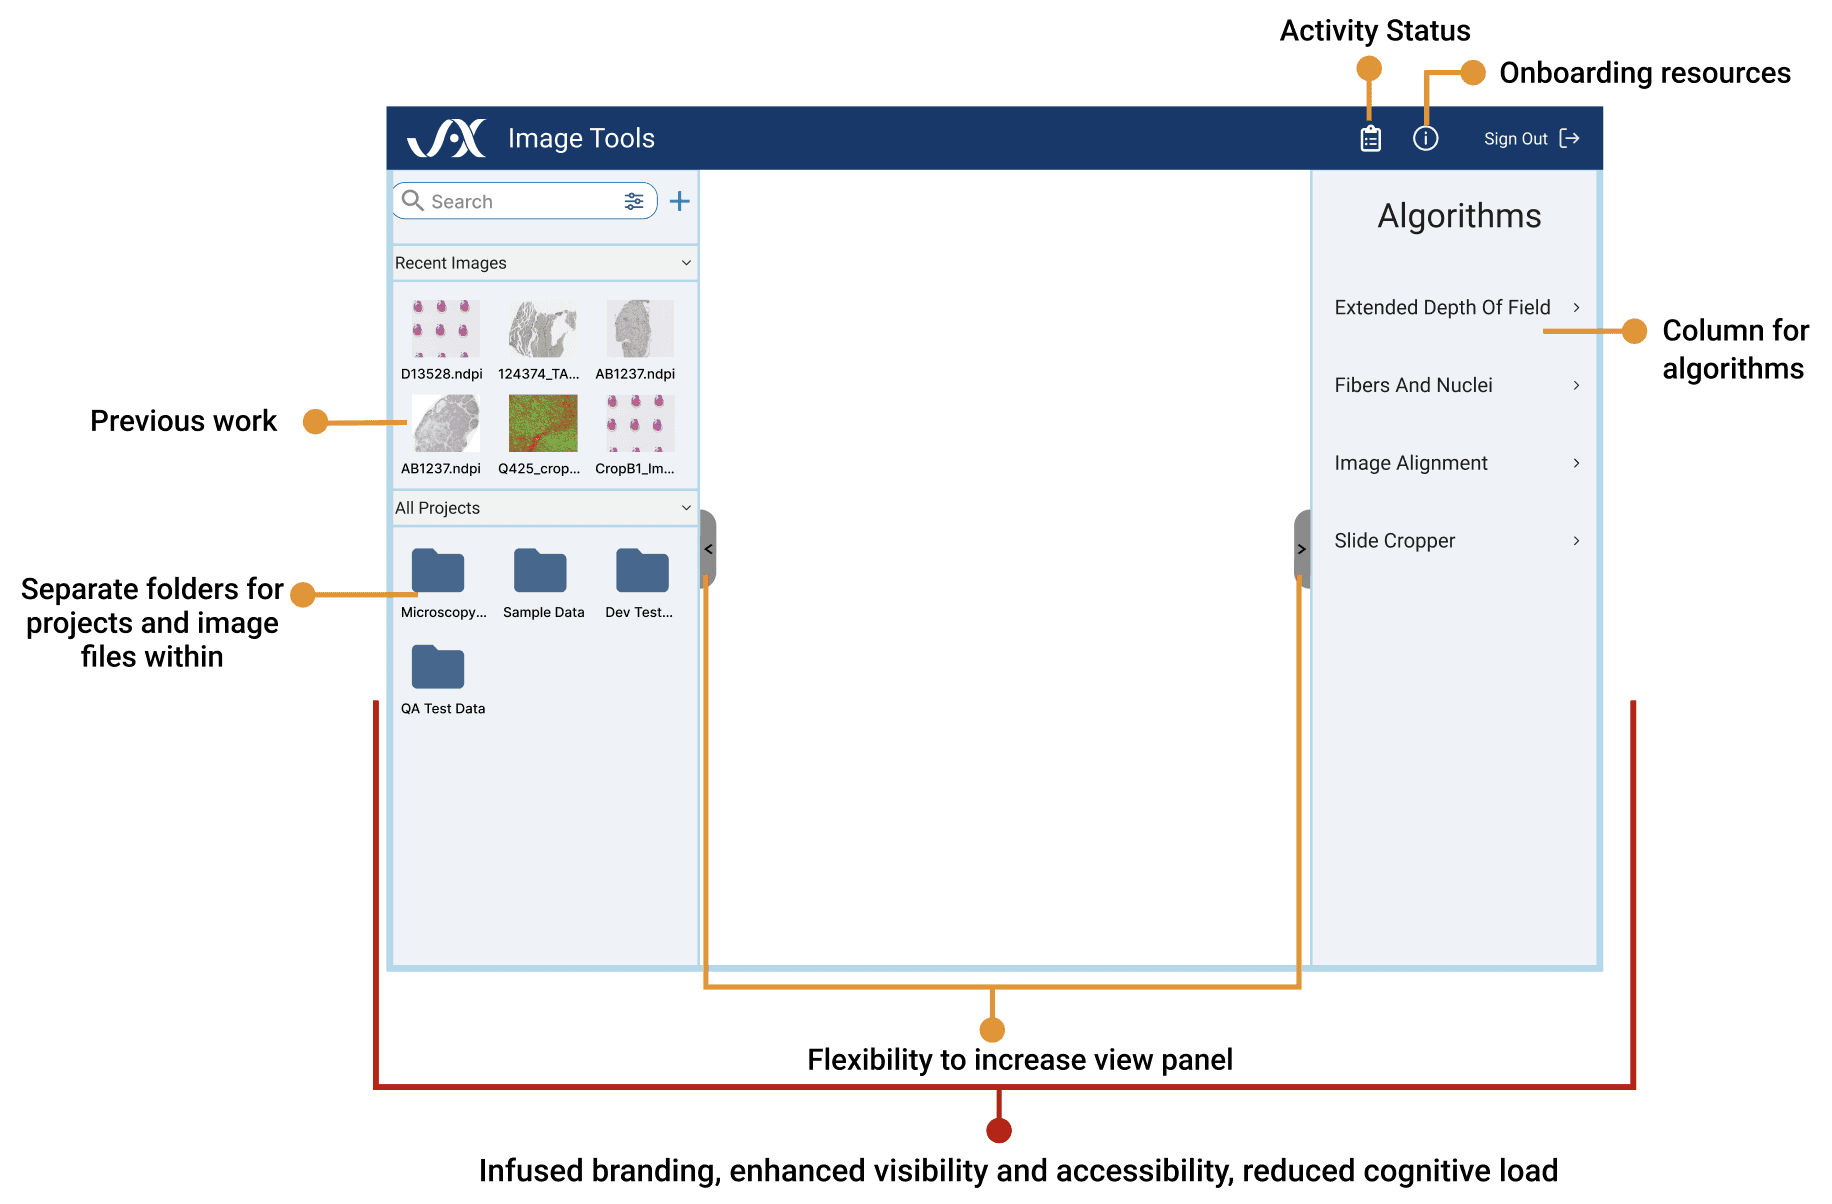
Step 7: Designed responsive, user-focused high-fidelity visuals powered by eye-tracking, first click test and usability insights
Created intuitive, user-centric features—visible and accessible right when users needs them.
How to navigate and access the Image ?
How to apply necessary edits/filters to the image selected and run it?
Later, I promptly applied Heuristic Evaluation in collaboration with the design team.
Step 8: Testing, Testing 1,2,3.. : What users' had to Say!
Crafted scenarios and prototypes for usability testing.
Collected feedback after each task and conducted SUS evaluation at the end of the session.
Implemented insights into the design.
Next Steps (saved for our future discussion)
I presented the end responsive prototype to the scientific research teams and computational sciences head team.
Presented detailed documentation of the project and submitted it for budget approval and to the scientific research team.
Learning Curve
Listing clear project requirements is the easiest way to find the solution.
Always keep the stakeholders updated— a top-rated suggestion for good reason.
Test interfaces effectively in early stage and not only during usability testing to avoid surprises and delay in projects.
BIOTECHNOLOGY TOOL
COMPANY : JACKSON LABORATORIES
APRIL - JULY 2023
TEAM SATISFACTION- 98%
Newbie's iterative research & design reduces workload by 55% and secures budget approval for image tool
Disclaimer: Claimed permissions to disclose project details
First things first - Brief Introduction
What is Cloud Images Tool(CIMG)?
CIMG, or Cloud Images Tool, is a cloud-native platform for developing and deploying conventional and ML/AI image analysis workflows. Users can conveniently perform image analysis tasks directly in a web browser, enhancing accessibility and usability.
Reason for Redesign - Problem Statement
Redesigning the interface to reduce workload by increasing flexibility and scalability through the following improvements:
Before / After Preview — key changes that enhanced user experience
How did the newbie in Biotech lead the project adapting to complexity?
Step 1: Got onboarded into the project
I conducted an internal team meeting with UX Manager and Mentor (Sr.UX Designer) to understand:
The problem statement
Quick overview and functioning of the tool
Budget limitations
Scope of the project
Sprint planning of the project
Timeline: 04/10/2023 - 07/27/2023
Key Stakeholders
information is displayed above.
Step 2: DIY discovery adventure [Tool Research Interviews]
After reviewing Cimg resources and familiarising myself with the tool through discussions with the Cimg developer, prepared targeted questions for interviewing 4 key stakeholders(users).
There are 5 different groups
Step 3: Research insights to visualising the flow [understanding common flows to maintain adaptability]
Research interviews showed diverse tool uses across teams, each familiar only with their own use cases. I streamlined individual workflows into a unified navigational path, working closely with the Project Manager and Developer to enhance understanding.
The flow outlined below is consistent across teams and crucial to maintain uniformity.
Step 4: From the map, into the users mind : 6 User Interviews, 1 Workshop later challenges were listed and synthesised
Six interviews were my gateway to user's current expectations, future goals, and deepest concerns.
But,
Out-of-Scope challenges post-workshop:
Multiple Images: Excluded to prioritise visibility.
Multiple Algorithms: Excluded due to increased cognitive load and reduced processing speed, which significantly impacts tool functionality.
Translating complex user data into clear requirements though pattern analysis
In summary, scientific researchers need a solution with a personalised brand identity, seamless accessibility, and intuitive features to boost productivity, enhance visibility, and streamline workflows.
Step 5: From requirements approval to design inspiration: Leveraging image processing tools(Figi & Omero) and data categorisation techniques for Low-Fidelity sketches
Step 6: Refined Low-Fidelity Designs: Finalised after 3 A/B testing Iterations
New wireframes prioritizing — Projects, Image Files, Algorithms, and the View Panel based on user needs for constant accessibility.
Step 7: Designed responsive, user-focused high-fidelity visuals powered by eye-tracking, first click test and usability insights
Created intuitive, user-centric features—visible and accessible right when users needs them.
How to navigate and access the Image ?
How to apply necessary edits/filters to the image selected and run it?
Later, I promptly applied Heuristic Evaluation in collaboration with the design team.
Step 8: Testing, Testing 1,2,3.. : What users' had to Say!
Crafted scenarios and prototypes for usability testing.
Collected feedback after each task and conducted SUS evaluation at the end of the session.
Implemented insights into the design.
Next Steps (saved for our future discussion)
I presented the end responsive prototype to the scientific research teams and computational sciences head team.
Presented detailed documentation of the project and submitted it for budget approval and to the scientific research team.
Learning Curve
Listing clear project requirements is the easiest way to find the solution.
Always keep the stakeholders updated— a top-rated suggestion for good reason.
Test interfaces effectively in early stage and not only during usability testing to avoid surprises and delay in projects.